
Why Roof Valleys Matter More Than They Look
If you stand in the driveway and look up at a roof with more than one roofline, you'll usually see at least one valley, the inward V-shape where two slopes come together. It doesn't look like much from the ground, but that narrow channel does more work than almost any other part of the roof. Every drop of rain that lands on either adjoining slope eventually funnels into it.
In North Texas, where heavy downpours can dump a lot of water in a short window, that concentration matters. A valley that's cut, flashed, or sealed even slightly wrong won't show a problem on a dry day. It shows up the first time water moves through it fast, which is exactly when you don't want to find out.
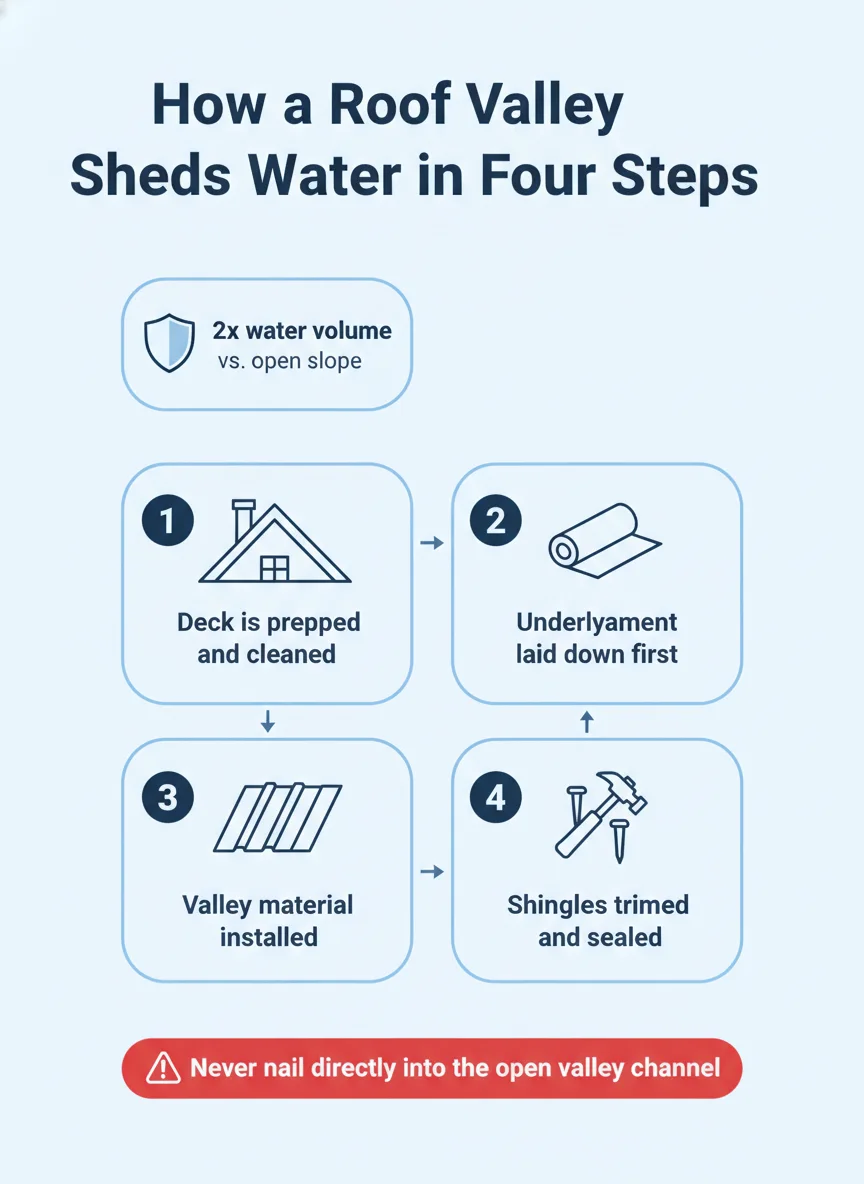
What Actually Happens Inside a Roof Valley
A roof valley is built in layers, and each one has a specific job. The decking underneath has to be solid and properly fastened before anything else goes down, because every layer above depends on a flat, stable base. From there, the valley gets its own underlayment, its own flashing or shingle treatment, and a trim line where the field shingles meet the channel.
The Underlayment Layer
Before any visible material goes down, the valley gets a layer of underlayment, often a self-adhering membrane in this section specifically because it's the area most likely to see standing water during a storm. This layer is the backup plan. If wind-driven rain or ice ever gets under the top layer, the underlayment is what keeps it from reaching the decking.
Skipping this step or using a lighter-duty underlayment in the valley to save material is one of the more common shortcuts that causes trouble years down the road. It's not a visible mistake at the time of install, which is exactly why it's worth asking about when you're comparing quotes.
The Valley Treatment Itself
Once the underlayment is down, the roofer chooses how the top layer handles the valley: woven, closed-cut, or open metal. Each method routes water differently and has different maintenance implications over the life of the roof, which is why the choice usually comes down to the roof's slope, material, and the amount of water the valley typically sees.
Open metal valleys tend to perform well under heavy water volume because there's a clear metal channel with nothing obstructing flow. Closed-cut and woven methods give a more uniform shingle appearance but rely more heavily on correct shingle overlap and nailing pattern to stay watertight.
| Valley Type | How It Works | Best Fit |
|---|---|---|
| Open metal valley | Exposed metal channel runs down the center, shingles trimmed back on both sides | Heavy water flow, steep slopes, long valleys |
| Closed-cut valley | Shingles from one slope run across, other side trimmed and sealed | Moderate slopes, clean shingle-only appearance |
| Woven valley | Shingles from both slopes interlace across the valley with no visible metal | Lower-slope roofs, traditional asphalt shingle look |
The Flashing and Fastening Details That Make or Break a Valley
Flashing in a valley isn't decorative, it's the piece that keeps water inside the intended channel instead of letting it wick sideways under the shingles. Metal flashing, where used, needs to be the right width for the valley's water volume and fastened in a way that never punctures the open channel itself.
Nail placement matters just as much as the flashing. Nails driven too close to the valley centerline create a path for water to travel backward under the shingles during a hard rain. A properly built valley keeps every fastener outside that zone, which takes more care and slightly more time than nailing a flat section of roof.
Step-by-step: How a Roofer Builds a Valley
The exact sequence can shift slightly depending on the valley type chosen, but the core steps stay consistent on almost every job.
- Clear and inspect the deck: Old material comes off and the decking underneath is checked for soft spots or rot before anything new goes down.
- Lay the valley underlayment: A dedicated underlayment runs the full length of the valley, centered on the channel, before the field underlayment is installed.
- Install the valley material: Metal flashing is set and fastened outside the water channel, or the shingle weave/cut method is prepped depending on the chosen style.
- Run the field shingles: Shingles from each slope are brought in toward the valley, trimmed to the correct line and angle without crowding the center.
- Seal the trim edges: Cut shingle edges along the valley line get sealed to keep wind and water from lifting them at the most vulnerable point.
- Final water test: A good roofer checks the valley for proper flow and tight seams before calling the section complete.
What a Failing Valley Actually Looks Like
Valleys rarely fail all at once. Most of the time they show small signs first, and catching those early is a lot cheaper than waiting for a ceiling stain to show up.
From the Ground
Look for granule buildup at the base of the valley, shingles that appear lifted or curled along the channel edges, or a visible gap where the metal flashing (if present) has pulled away from the shingle line. Binoculars from the driveway are often enough to spot these without getting on a ladder.
A valley that's holding debris, leaves, or standing water after a dry day is also worth noting. That usually means the slope or the flashing isn't routing water the way it should, and standing moisture against asphalt shingles shortens their life fast.
From Inside the Attic
Valleys sit directly above the spots where two roof framing sections meet, so attic leaks tied to a valley problem often show up as a water stain running along a rafter or truss near the center of the house rather than at an outside wall. A flashlight check after a heavy rain is one of the most reliable ways to catch a valley leak before it reaches drywall.
Dark staining, a musty smell, or sagging insulation in that area are all worth a closer look. None of those confirm a valley is the source, but they're common enough with valley leaks that it's the first place worth ruling out.
Is This a DIY Job or One for a Licensed Pro?
Basic maintenance, like clearing debris out of a valley or doing a visual check from the ground after a storm, is reasonable for most homeowners to handle on their own. It's low risk and doesn't require touching the roof's water-shedding layers.
Actually cutting, flashing, or replacing a valley is a different story. It involves working on a steep slope at the roof's most water-prone point, cutting shingles to a precise line, and getting the underlayment and flashing sequence right the first time. A mistake here doesn't just affect one shingle, it can compromise the whole roof section below it.
This is one of the areas where Roof Repair work benefits from experience rather than trial and error. A roofer who's cut dozens of valleys knows how the shingle angle, the flashing width, and the fastener pattern all need to line up before the first rain tests the work.
Keeping a Valley Watertight for the Long Run
A well-built roof valley should last as long as the rest of the roofing system around it, as long as it was installed correctly and checked periodically for debris or wear. Regular Roof Inspections & Maintenance visits are a practical way to catch the early warning signs before a small gap turns into a ceiling stain, especially in a region like the DFW Metroplex where heavy seasonal rain tests every valley on the roof at least a few times a year.
If you're weighing whether a valley problem needs a full section replacement or a targeted repair, it's worth reading through our breakdown on roof replacement options homeowners choose between for context on how roofers make that call. Renovacore Builders LLC works on valley repairs and full roof systems throughout the metro and can walk you through which approach fits your specific roof.
Frequently asked questions
What is a roof valley and why does it leak so often?
A roof valley is the inward angle where two roof slopes meet, and it leaks more often than flat sections because it collects and funnels water from both sides into one narrow channel. If the underlayment, flashing, or shingle trim in that channel isn't installed correctly, water finds the gaps fast.
What's the difference between a closed-cut valley and an open metal valley?
A closed-cut valley uses shingles from one slope that run across the valley while the other side is trimmed back, giving a clean shingle-over-shingle look. An open metal valley leaves a strip of metal flashing exposed down the center, which tends to handle heavy water volume more consistently over time.
Can a roof valley be repaired without replacing the whole roof?
In many cases, yes. If the surrounding shingles and decking are still in good shape, a roofer can often strip back just the valley area, replace the underlayment and flashing, and re-lay the shingle trim without touching the rest of the roof.
How do I know if my roof valley is failing?
Watch for granules collecting at the bottom of the valley, shingles that look curled or lifted along the channel edges, or a water stain on the ceiling that traces back to where two roof planes meet inside the attic. Any of those is worth a professional look before the next heavy rain.
Is a roof valley more expensive to repair than a flat section?
Valley repairs can cost more than a flat-slope repair because of the extra flashing material, the labor to tie in both roof planes correctly, and the care needed to avoid disturbing more shingles than necessary. The exact cost depends on the valley length, the material used, and how much of the surrounding roof needs to come up.